XMLMax Help
This online help documentation was written for version 4.4 of XMLMax. While much of it applies to prior versions, customers with earlier versions should refer to the help file installed
with their version.
XMLMax is an XML editor that uses a Tree View to display, edit, search and validate XML documents. A read-only Text View is also provided.
Only well-formed XML may be loaded into the treeview.
If a well-formed error is encountered when a file is opened and parsed, a text editor is provided for correcting the error.
An XML document may be validated using one or more schemas, or with a DTD. The default setting is to not validate when the file is opened in the Tree View, but
there is a setting in the Options menu to validate while the file is being opened. It may also be validated in the Text View.
XMLMax supports XPath 1.0 queries and XSLT 1.0 for XML documents that can be fully loaded into available memory.
XMLMax supports three character encodings: UTF-8, which is the default, UTF-16(unicode) AND ISO 8859-1.
Named entities are dereferenced (expanded) if they are defined in an internal DTD (DocumentType declaration),
but not in an externally referenced DTD. The expanded entity is displayed in the treeview, and the entity reference in the Edit Panel.
When the document is saved, the entity in the xml document remains unchanged, unless the user changed it in the Edit Panel.
The fastest way to search text or validate XML is in the Text Viewer because it opens files instantly, but is a read-only file viewer. The Treeview is editable and offers more features, such as a results list with a Go to function for text search, validation and XPath.
Most Tools menu items may be accessed without first opening the XML in the treeview.
An XML file may be validated during the initial reading of the file when it is opened in the Treeview, provided a schema file is first selected (Validate menu) or a schema is referenced in the XML file. It is necessary to first check "Validate on file open" in the Options Dialog. If the XML has internal schema, then check the Process Inline Schemas in the Options Menu.
It can be validated after it is opened by using the Validation menu, but validating on file open saves time by not having to read the file twice.
The XML Path Navigator on the Tools menu is not enabled by default: use the Options dialog to enable it.
When enabled, the shortcut keys Ctrl +P and Shift +P navigate to the next and previous occurence of the currently selected path in the treeview.
The Tree View is the primary view for XML files because it offers the most features. A read-only Text Viewer is also available.
When an XML document is selected and opened in the Tree View, it is read and checked for xml syntax errors, known as "Well-formed"
errors, using the Microsoft XmlReader.
If you receive an error message "Root element is missing" it means that the contents of the file are not encapsulated within a single XML element.
This is a minimum requirement for an XML file. When this occurs, the XML parser assumes the file is not an XML file, stops processing.
The file must be opened with a text editor(use View Source in XMLMax or other text editor and add the start tag and end tag for a root element.
Large XML documents are read and parsed incrementally. The sections that have been parsed may be edited and navigated while the rest
of the document is being read asynchronously. A red light in the status bar indicates the document is still being read.
It changes to green when the document has been fully read and parsed.
The initial parsing of the xml that occurs when an Xml document is first opened does not validate, and externally referenced DTD or schema files are not accessed.
After a file has been read, a small meta file is created with the same name as the xml file but with an addtional ".stb" extension,
e.g., "c:\temp\testxml.xml.stb." The meta file facilitates fast re-loading of the file the next time it is opened without having to fully parse it,
provided that it has not been modified. A meta file is less than .0005 the size of the xml file.
However, if the option to Allow undeclared entities (Options dialog) is changed, the meta file is deleted,
thereby requiring a complete parsing the next time the file is opened.
Due to its virtual nature, dragging the scrollbar does not scroll the xml elements as the thumb is being dragged,
as would happen in a conventional treeview. Only when scrolling stops is the treeview updated. The same applies to use of the mouse wheel.
Named entities are dereferenced (expanded) if they are defined in an internal DTD (DocumentType declaration),
but not in an externally referenced DTD. The expanded entity is displayed in the treeview, and the entity reference in the Edit Panel.
When the document is saved, the entity in the xml document remains unchanged, unless the user changed it in the Edit Panel.
The XMLMax main window contains two panels.
- The panel on the left displays the XML in a treeview.
- The Edit panel on the right contains textboxes for editing attributes and text of the selected treeview node.
Status Bar
The status bar at the bottom of the XMLMax Window is used to display the following information about the currently open xml file:
- File name
- Total number of nodes
- Byte size
- Encoding
The status bar displays a progress bar during operations such as saving and searching. It is also used to display
the number of nodes deleted following a delete operation.
The node count shown in the status bar may not be the same as the number of nodes in the xml file for the following reasons:
- The treeview combines an element and its text node into one tree node.
- If the text node is the only child of the element, the end element is merged into the same tree node.
- If an XML element is empty and the raw xml contains both a start tag and an end tag, the tags are merged into the short form for an empty element.
Message Grid
The message grid above the status bar is used to display validation error messages and the results of text search and XPath query.
It is also used to display messages about well-formed errors that occur when an xml file is first opened and parsed.
Tool bar
The Tool bar contains icons representing many of the menu items. An icon may be clicked to activate its associated function.
Recent files combo
The recent files combo contains the ten most recently opened.XML files. Selecting one of the files in the list opens the file and displays it in the treeview.
Navigating the Treeview
The treeview displays XML elements and is used to navigate through the XML document using the keys listed below or the scrollbar.XML content must be edited in the Edit Panel. The horizontal scrollbar may be used to scroll horizontally.
The Path Navigator on the Tools menu may be used to navigate to the first occurence of a path, and Ctrl + P and Shift +P to next or previous path, respectively.
Keys
| PageDown | navigates to the next page down. The selected node becomes top node on new page |
| PageUp | navigates to the next page up. The selected node becomes bottom node on new page |
| Ctrl Home | navigates to the page containing the first node in the document |
| Ctrl End | navigates to the page with the last node in the document. Ctrl End does not function(will beep) until a document has been completely read(right light changes to green), or when the root element is not expanded |
| Up Arrow | in the Treeview, selects next node up. If current node is the top node on the page, navigates to the next page up. |
| Down Arrow | in the Treeview panel, selects next node down. If current node is the bottom node on the page, navigates to the next page down. |
| Tab | cycles between the Treeview and the Edit panel |
| Add or plus-equals key | Increments font size by one point to a maximum of 24. |
| Subtract or minus-dash key | decrements font size by one point to a minimum of 6. |
| F2 | Expands the text of the selected treeview element or comment. |
| Ctrl + G | Navigates to the end tag of the selected element, or to the start tag when the end tag is selected. |
| Ctrl + N | Prompts for a node number and navigates to that node. |
The treeview displays only the first 2000 characters of a text node or comment. The F2 key displays a dialog containing the entire text, up to a maximum of 32,000 characters.
Expanding and Collapsing XML Elements
- The expand or collapse icon next to an element expands or collapses that element only and displays the next level of nodes within it, but not their descendant nodes.
- The expand and collapse icons in the toolbar expand or collapse the descendants of the selected node, but do not work on the root element. Since this feature is limited to the elements in the current memory buffer, collapsing an element with a large number of descendants may not collapse all of them.
- Double-clicking an element containing children is an alternative to clicking the expand or collapse icons next to the element.
Deleting a Range of Nodes
A range of nodes may be deleted by selecting the first and bookmarking it with Ctrl +B, and the last node with Ctrl + E. Ctrl + D then deletes the entire range after
prompting for an OK. The Tools menu has a submenu for executing each step.
ScrollBar
The vertical scrollBar is locked when the root element is not expanded.
Dragging the scrollbar does not "Slide" the XML elements in the treeview panel, as a browser or wordprocessor would.
Rather, when the thumb is released, the treeview is refreshed with the elements at that location in the file. The reason is the treeview contains only the nodes that are displayed and must be refreshed with other nodes following the scroll action.
The vertical scrollbar represents the entire population of XML nodes in the document, whereas the treeview never contains more nodes than are visible. This results in scroll behavior that is somewhat different from a conventional treeview control that contains the entire population of XML nodes. When the scroll thumb is dragged to a new position, the XML node corresponding to that exact position is displayed at the top of the page. If the node is a child node, its parental chain of nodes is dynamically expanded. Paging up from this node will display its siblings and ancestors.
Go To Start-End Tag
This command may be used to go to from an element's start tag to its end tag, or vice versa. However, it
cannot go to a start tag from its end tag unless goto was previously used to go from the start tag to the end tag, or the start tag was collapsed. The keyboard short cut is Ctrl G.
Go To Node Number
Each node in the treeview is numbered sequentially, beginning with one, and including end elements that appear as a separate tree node(as opposed to an end element that was merged with its start element and text node into a single tree node). The tree node number of the selected node is displayed in the status bar. Pressing Ctrl + N displays an input box for entering a node number which is navigated to when the Enter key is pressed.
Navigating Large Documents
Large XML documents are read in segments. As soon as the first segment has been read, those elments may be edited and one may page and scroll through the document while the remainder is being read(asynchronously).
- If the scrollbar is locked while a large file is being read, the PageDown key should unlock it.
Each time a Page key is pressed, or the scroll bar is moved, the range of the scrollbar is updated to the last read position in the document. Dragging the scrollbar to the bottom will result in it snapping back up to some degree because the end of the document has not actually been reached. This behavior will continue until the entire document has been read, at which time the red light changes to green. The document may not be saved until it has been completely read.
Ctrl End does not function(will beep) until a document has been completely read(red light changes to green).
Several features, including saving a file and searching, are disabled until a file has been completely read.
After a large file has been read, a small stub file is created with the same name as the xml file but with an addtional ".stb" extension, e.g., "c:\temp\testxml.xml.stb." The stub file facilitates fast re-loading of the file the next time it is opened without the need to fully parse it, provided that it has not been modified. The stub files are less than .0005 the size of the xml file.
Path Navigator
The
Tools menu has a Path Navigator which can be helpful in navigating large documents. It lists every unique XML path in the document.
Double-clicking a path displays the first occurence of that path. Ctrl + P and Shift + P display the next and previous occurence of the path.
In order for this feature to be available, the XML file must be opened after the Process XML Paths checkbox is checked in the Option Dialog.
An entire XML document, may be valdated against an internal or external schema or DTD or using inline schemas if the Process Inline schemas option is enabled.
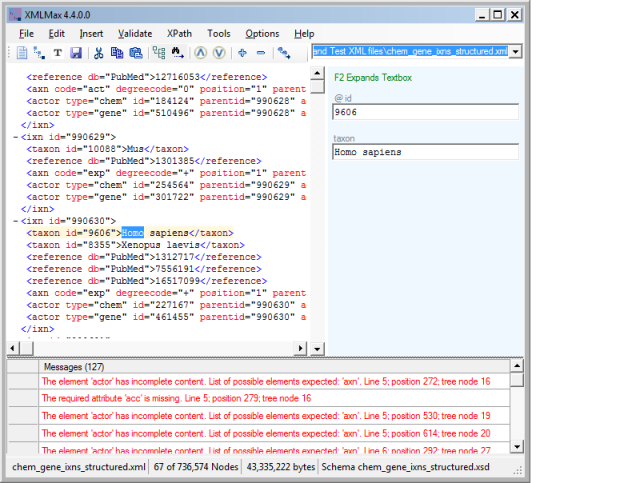
XMLMax offers two methods of XML validation using the Tree View. For both methods, validation errors are displayed in the Messages grid below the treeview.
1. Validate Upon Open. To validate an XML document when it is opened from the File|Open menu, check Validate Upon Open in the Options Dialog.
Note that this will result in validating all XML files when they are opened until this option is changed.
2. Validate Menu. To validate an XML document after it has been opened, use the Validate Menu, select a schema file and then chose Validate Document from the menu.
If this method is used, it is recommended that all elements in the treeview should be fully expanded. If there are any validation errors listed in the Messages grid,
double-clicking an item navigates to the element that caused the violation. However, if that element is the child of an element that was collapsed by the user,
it cannot be displayed and a warning is displayed. To resolve this, either expand the element or re-open the file and validate again.
An XML document may also be validated in the Text View, but since it is read-only, it is not possible to edit any valiation errors and the Validate On Open option is not
applied to Text View.
The Options dialog contains several validation related options.
An XML document may be validated when it is first opened in the Tree View by checking the Validate on file open option. Otherwise,
if the Xml document is not validated on open, externally referenced DTD or schema files are not accessed, regardless of how the options for ProhibitDTD,
IgnoreDTD and Process schema location hints are set.
If the XML file has no inline schema or internal DTD, and does not reference an external schema or
DTD, a schema or DTD file should be selected from the Validate menu. Otherwise, every node
will trigger a validation error.
When validating a XML document with an inline schema, ProcessInlineSchema must
be checked in the Options dialog. Note that the root element cannot be validated when an
inline schema occurs because it appears as a child of the root element. Validation in this
case will always report an error on the root element.
Validation errors are reported in the Messages grid below the Tree view. Right clicking the mouse over a specific validation error displays a c
ontext menu with a Go To option that redraws the Tree and selects the element with the error.
If there are more than 1000 validation errors, only the first 1000 are added to the validation error messages.
Schema and DTD Files
A schema or DTD file is selected from the Schema Menu. Muliple schema files may be selected, provided there are no type conflicts.
Any error or conflict in the schema file(s) is reported when an attempt is made to validate either the document or the selected tree node.
If the XML document is saved and immediately re-selected, the selected schema file remains selected.
If the validate on open option is activated in the Options dialog, a schema or DTD file that is selected is not closed
when the validation is complete. It will continue to be used to validate when other XML files are opened(unless validate on open is turned off)
and could result in numerous validation errors. If the schema file does not apply to the selected XML file, use Close Schema on the Validate menu
to close the current schema and select a different one if needed. If not closed, selection of another schema file appends it to the current schema
set and multiple schemas will be applied during validation as explained below.
External DTD files are supported if located on the local machine and specified
with the SYSTEM attribute in the DOCTYPE node, otherwise they are ignored.
If multiple schemas are required to validate, additional schemas may be selected and are added to a SchemaSet.
The name of the last selected schema file appears in the status bar and a tooltip containing the names of all selected schemas in the schemaSet is displayed
when the mouse hovers over the schema file name.
Validate Menu
If the XML file does not reference an external schema or DTD but requires one, use Select Schema on the Validate menu.
f the file is to be validated when it is opened, this must be done prior to opening the XML file.
If the file is already open in the treeview, it may be validated using Validate Document on the Validate menu.
All nodes that are flagged as having a validation error are tracked using internal
bookmarks. This enables the goto function to locate an error node. The XML file must be re-opened to perform another validation because this removes
the internal bookmarks.
An attempt to insert an element or attribute that is in violation of the schema is blocked and a detailed error message is provided. Validation is not
provided for the Insert Fragment function. The Close Schema item on the Validation menu clears the schemaset and removes internal references to any
schema or DTD files that had been selected..
Changes made to the XML document are not validated unless the document is first saved.
The line numbers reported in the message area for each validation error refer to line numbers in the raw xml file. These line numbers may not always
correspond exactly with Tree View nodes for a number of reasons. The raw xml file may contain multiple nodes on one line. Also, tree nodes
combine XML start and end tags into a single tree node when an element is empty or its only child is a text node.
Create Schema
The Create Schema item on the Validate Menu infers one or more W3C XML Schema Definition Language (XSD) schemas from the XML document currently open.
If the XML document contains elements and attributes from multiple namespaces, then multiple schemas are generated: one for each namespace used in the document.
A separate file is created for each schema, and they are all contained in a schemaSet. If multiple schema files are created, each successive file is named
by adding a numerical incrementer to the root name of the file, for example, books.xsd, books1.xsd, books2.xsd.
The primary schema is the schema that can validate the entire XML document, and its target namespace is the same as the namespace of the document
element of the XML document.
This feature ignores any xsi:type, xsi:schemaLocation, or xsi:noNamespaceSchemaLocation attributes in the XML document.
After a schema is successfully created, it is automatically invoked and its name appears in the status bar. The Schema Close menu item may be used
to prevent Inserted items from being automatically validated against the schema.
The Text View can handle any size XML or text file. It is a read-only file viewer that
displays the unformatted text of an XML or text file. Unlike the TreeView, it does not parse the file to check if it is well-Formed XML.
Use the TreeView for that functionality. However, it does provide XML Schema Validation using an XML parser which stops validation if a well-formed error occurs.
Text View is available from the File or Tools Menu or Toolbar icon.
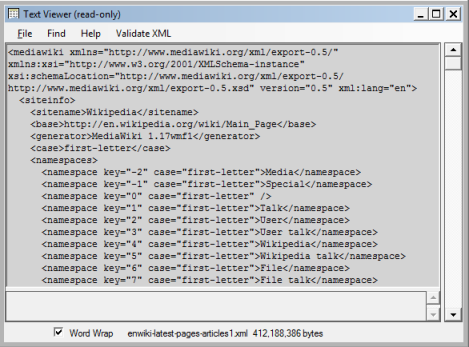
If an XML file is currently in the treeview when the Text Viewer is selcted, the XML file is automatically displayed in the Text Viewer,
but any unsaved changes will not appear in the Viewer.
If there is no file open in the Treeview, an open file dialog is provided.
Go to file position
The File menu Go to position function allows you to instantly navigate to any position in the file. The file position is the byte offset in the file.
Text Search
The Edit menu has a Find feature that provides very simple text searching. A search always starts and continues from the current text position.
When a match is found, the F3 key resumes the search. The Escape key cancels a search.
Validate XML
If the file is an XML file, it may be validated against an XML schema or DTD. The schema or DTD may be selected via the Validate menu,
or from the Tree View Validate menu prior to opening the Text Viewer. If the file has an inline schema, you must first check Process Inline Schemas in the Options menu .
The Escape key cancels validation.
XMLMax adheres strictly to the XML standard approved by the World Wide Web Consortium ( W3C), XML specification 1.0.
When an XML document is selected and opened, it is parsed and checked for XML syntax and structure errors, known as "Well-formed"
errors, using the Microsoft XmlReader. When such an error is encountered, the XML specification requires that the error be reported to the user
and parsing the XML should stop. When this occurs, XMLMax provides an option to fix the error with a built-in text editor,
which opens the full text of the XML document with the error line colored in red.
Please refer to the text editor topic for details on fixing XML errors.
The XMLMax Text Editor is used for fixing XML syntax and structure errors, i.e., errors reported by the XML parser when an XML file is opened for
display in the Tree view. It is not recommended for editing other than fixing the reported error because it has no XML specific features.
Since the error prevented the XML parser from continuing,
it is not possible to accurately provide XML specific ediing features, like syntax checking, XML element auto-complete, etc.
This is also the reason is not available directly from the XMLMax menu. The Text Editor provide a text search,
and it is possible to navigate anywhere within the file.
When an XML error occurs, the user is given the option to open the file in the Text Editor. If the user chooses that option, the file is positioned
at the line reported in the error.
To demonstrate, a small XML file was appened to a very large one. When the file is opened, an error occurs when the Xml Declaration node that was at the start of the appended file is read because it must be the first node in an XML file. The reported error message is:
Data at the root level is invalid. Line 4194027, position 9.
When the Text Editor is opened, as shown in the screen shot below, the error location is automatically colored red and is highlighted; in this case
the first character in the Xml Declaration.
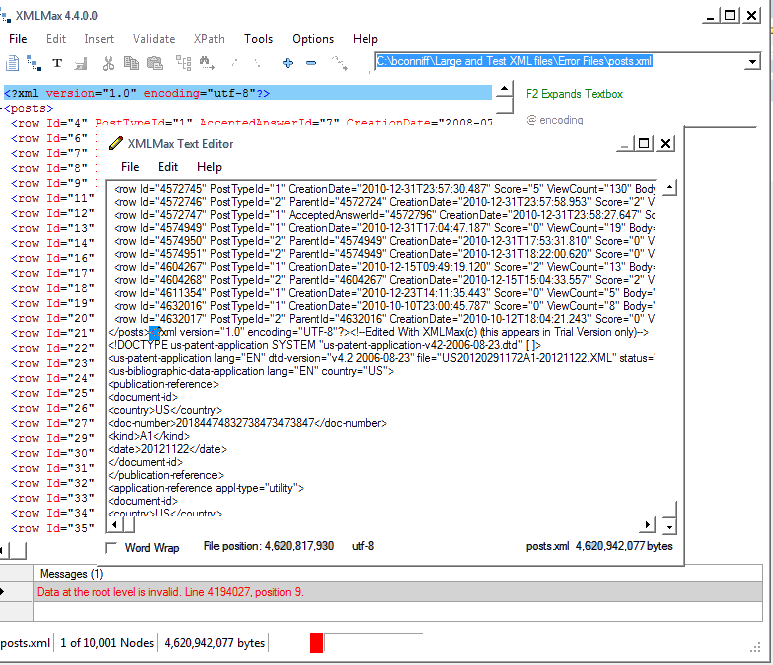
When the Text Editor opens it is centered over the Tree view. It does not show line numbers, but rather the file position. The reason is that counting line numbers is slow so if the error occurs deep in large file, it will take awhile to display the error.
Go to file position
The File menu Go to position function allows you to instantly navigate to any position in the file. The file position is the byte offset in the file.
Text Search
The Edit menu has a Find feature that provides very simple text searching. A search always starts and continues from the current text position.
When a match is found, the F3 key resumes the search. The Escape key cancels a search.
Go To Error
The Edit menu has a Go to error, which allows you to instantly return to the error location from anywhere in the file.
Saving the file
The File menu's Save also exits the Text Editor. It is not possible to save the file first and then exit. The reason
XML errors
When the error message contains one line number, the error within that line should be fixed.
If two line numbers are reported, it generally indicates that the XML elements are not properly nested, i.e., each start tag has a
matching end tag at the same depth in the XML hierarchy. If the two line numbers are close, it is typically easy to spot the problem.
But if they are not close, it can
be difficult to locate the problem because the error, such as a missing end tag, may not be at, or even near,
either reported line number.this until it reaches the end tag for the root element. When two line numbers are reported
the file is displayed at the second reported line number. The Go to error function will then list both line numbers so that you may return to either one at any time.
Adding Nodes
The Insert Menu contains items for inserting different types of nodes, as well as attributes, some with options to insert before,
after or as a child, to the currently selected treeview node. These items are enabled or disabled based on the W3C rules for a well-formed XML document.
An attribute is always inserted as the last attribute of an XML Element. If an element has multiple attributes, their order is easily changed in the Edit Panel
using the shortcuts Ctrl + Add key to move an attribute down and Ctrl + Subtract key to move it up.
Insert Root. Prompts for an element name and inserts it as the root elmemt. The previous root becomes the first child element of the new root.
If successful, the XML file is automatically saved and must be reloaded.
An XML fragment in the form of an external file may be inserted in the treeview with the Insert\Fragment menu item.
This displays a File Open dialog for selecting the fragment file. The fragment is inserted immediately before the currently selected treeview node. If the fragment is not well-formed it is not inserted.
Insert XmlDeclaration.The first node in the Tree View must be selected. If the XML does not already have an XmlDeclaration node,
a new XmlDeclaration is inserted as the first node in the XML. Otherwise, the existing XmlDeclaration is edited. A dialog displays the two optional attributes
than an XmlDeclaration may have. Use the checkbox to indicate if an attribute is to be included, and the corresponding radio buttons to choose
the value for the attribute. If neither attribute is selected, the XmlDeclaration will contain only the required version attribute.
The Edit menu also has an XmlDeclaration item for editing an existing XmlDeclaration node.
Note: the attributes of an existing XmlDeclaration may also be edited in the Edit Panel but requires typing the value.
If a node is inserted during an active text search or validation a message box warns that the insert will cancel the search or
validation with the option to cancel the insert. If the insert is not cancelled, the search or validation results in the message grid are cleared.
Copying and Pasting Nodes
Treeview nodes may be copied and pasted anywhere in the document. The Edit\Copy menu item, the Copy toolbar icon or the Copy Context Menu item,
which may be displayed by right-clicking the mouse when held over a treeview node, may be used to copy a treeview node. Similar methods are available for pasting nodes.
If the node is an XML Element with child nodes, all descendant nodes are also copied.
When a treeview node is copied, the paste icon's background color changes to green and the paste icon's tooltip shows the name of the copied node,
indicating the item may be pasted.
Due to memory contstraints, it may not be possible to copy an element with a large number of descendent nodes.
Note that there are two modes for pasting: insert and overwrite. The default mode is overwrite and it may be changed to insert mode on the Edit menu.
When the mode is Insert, the copied node is inserted after the currently selected treeview node. A copied element is held in memory even after selecting
and loading a different document, thereby enabling it to be pasted into another document. However, treeview elements are not copied to the clipboard.
The traditional Ctrl+C, Ctrl+X and Ctrl+V shortcuts for copy, cut and paste, respectively, work in the Treeview.
When a treeview node is copied, the raw xml is copied to the Windows Clipboard, up to a maximum of 50,000 characters.
Deleting Nodes
The currently selected treeview node may be deleted with the Edit\Cut menu item, the Cut toolbar icon, of the Cut item on the Context Menu.
If the selected node is an XML element, all of its child nodes will also be deleted. The deleted element is automatically copied into XMLMax’s
memory buffer and may be pasted to another location in the document.
Deleting a Range of Nodes
A range of nodes may be deleted by selecting the first and bookmarking it with Ctrl +B, and the last node with Ctrl + E. Ctrl + D then deletes the entire range after
prompting for an OK.
When treeview nodes are deleted, the statusbar at the bottom of the screen displays the number of nodes deleted by the last delete action.
It is not cummulative and is cleared following any insert, save, file open operation.
Deleting Attributes
The currently selected attribute in the Edit Panel may be deleted with the Edit\Delete Attribute menu item, or the Cut toolbar icon.
XmlDeclaration attributes may also be deleted by selecting XmlDeclaration in either the Edit or Insert menu which displays a dialog with a checkbox for each attribute.
When treeview nodes are deleted, the statusbar at the bottom of the screen displays the number of nodes deleted by the last delete action.
It is not cummulative and is cleared following any insert, save, file open operation.
The file menu Save and Saveas options save the current file. Note that when the file is opened and parsed with an XmlReader, line endings are normalized
in accordance with the XML 1.0 specification. The combination of a carriage return and a line feed is replaced with a line feed. A carriage return alone
is replaced with a line feed. By default, that is how line endings, if they occur in the file, are saved. However,
The Edit menu has three options for converting End-Of-Line (EOL) characters. The conversion occurs when the file is saved.
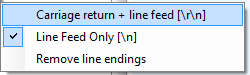
- Carriage return and line feed. Carriage returns that occur alone and line feeds that occur alone are replaced with a carriage return plus a line feed,
which is the Windows standard line ending.
- Line feed only. The combination of a carriage return and a line feed is replaced with a line feed. A carriage return alone is replaced with a line feed.
This results in the XML and Unix standard.This is the default behavior. It is applied if none of the options is selected.
- Remove. All occurences of carriage returns and line feeds are removed.
Note that if the file has no line endings, none of the options can be applied.
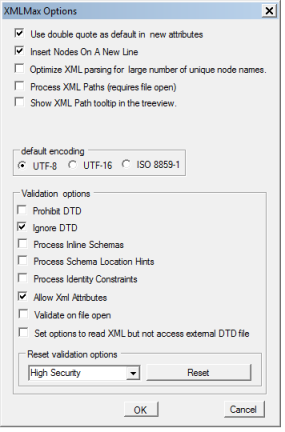
The Options dialog has several options with values that may be set. Separate settings are saved for each Windows user (the .NET User Settings is employed).
Each option and its meaning is listed in the table below. Some of the schema options have security implications and their default values are set for maximum security.
Schema related options affect
Validation only. The initial parsing of the xml that occurs when an Xml document is first opened does not validate.
During initial parsing, externally referenced DTD or schema files are not accessed.
| Use Double Quote as Default Quote Character | This is used for setting the quote character used when inserting a new attribute.
If the checkbox is unchecked, the single quote character is used. |
| Insert nodes on a new line | If checked, inserted nodes are written to the xml file with a carriage return, otherwise, new nodes are inserted
without a carriage return or line feed. |
| Optimize XML parsing. |
This option improves parsing speed and reduces memory use by not storing element or namespace names in the XmlNameTable. See note below
|
| Encoding For New XML Documents | Sets the encoding to be used when a new XML document is created with XMLMax. If utf-16 is selected, the document
will be written with the little-endian byte order. |
| Process XML Paths | Enables use of the Path Navigator(Tools menu). Must be checked prior to
opening an XML file |
| Show XML path in treeview tooltip | Shows XML path of selected treeview node as a tooltip.
It is dependent on the Process XML Paths option. |
| Prohibit DTD | Do not allow validation using a DTD. |
| Ignore DTD | No attempt will be made during validation to access external DTDs referenced in the XML. |
| Process Inline Schema | Allow validation using inline schemas. |
| Process Schema Location Hints | Resolve schema locations encountered in the XML document. |
| Process Identity Constraints | Process Identity Constraints . |
| Allow XML Attributes | Allow xml:* attributes even if they are not defined in the schema.
The attributes will be validated based on their data type. |
| Validate on file open | The selected XML file is validated when the file is opened. See the
Validate on open section below for more information.
|
| Set options to read XML but not access external DTD file. | ProhibitDTD is set to false,
Ignore DTD is set true and Process schema location hints is set false.
This allows the XML file is to be opened in the treeview but no attempt is made to open any external DTD that might be referenced.
|
Check this option before opening a file if the file contains a very large(over 5 million) number of elements with unique names,
or if a significant drop in available memory occurs during parsing an xml file has a large numer of uniqely named elements.
Such files may otherwise result in very slow performance parsing the XML, which should be entirely resolved by using this option.
When this option is checked, the XML is checked for syntax (well-formed) errors during parsing.
Important There are side effects of using Optimized Parsing.
When this option is used, declared namespaces are not tracked.
During Validation, if the schema specifies a target namespace, validation will not
work correctly if the optimize parsing option is checked. It can also result in an "undeclared namespace" error when the file is opened
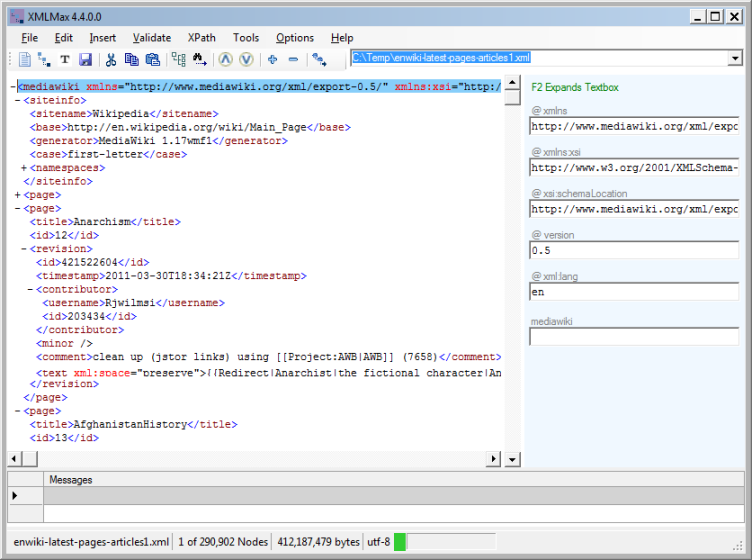
if a namespace declaration is dependent upon a prior namespace declaration. In the example below
the xsi namespace is dependent on the xmlns:xsi namespace.
<mediawiki xmlns="http://www.mediawiki.org/xml/export-0.5/"
xmlns:xsi="http://www.w3.org/2001/XMLSchema-instance"
xsi:schemaLocation="http://www.mediawiki.org/xml/export-0.5/
http://www.mediawiki.org/xml/export-0.5.xsd" version="0.5" xml:lang="en">
Validate on open
If the Validate On Open option is checked there are two important considerations:
1. XMLMax resolves entity references, such as &author; which for example might be declared
as "William Faulkner".if the xml file is saved, the resolved entity, "William Faulkner" is
saved in place of the reference &author;.
2. The option for Undeclared entity handling is overridden; If any Undeclared entity occurs
an error message is displayed and the XML file is closed.
If the optimize parsing option is used, namespace declarations are ignored. Therefore,
elements with a namespace prefix declared in the root element will result in a validation error message.
Reset Schema Options
The Reset button may be used to reset the values for some of the schema options to either maximum or minimum security.
The Allow XML Attributes option is not reset because it has no security implications.
Data may be located using either an XPath expression or a text search. Text search also provides a replace function.
The Text Viewer also provides a text search, but not replace since it is a read-only file viewer.
When either an XPath query or text search is performed, the corresponding toolbar icon's background color is set to blue to provide
a visual indicator regarding the currently active search.
XPath always starts a new search at the beginning of the document. Text search starts a new search from the current treeview node,
unless the Find All option is selected in which case the search starts at the beginning of the document.
XPath Query
XPath query is accessed from the XPath menu which displays an XPath query dialog shown below.
XMLMax supports XPath 1.0 queries. There must be sufficent memory to hold the entire XML file.
The option to show results in the treeview should not be used if the XML has CDATA or mixed content text nodes
because the XPathDocument object used for XPath does ignores them. If any of these occur, the shown tree node will be off by the number of
those nodes that occur before the matching node.
Xpath Query Dialog
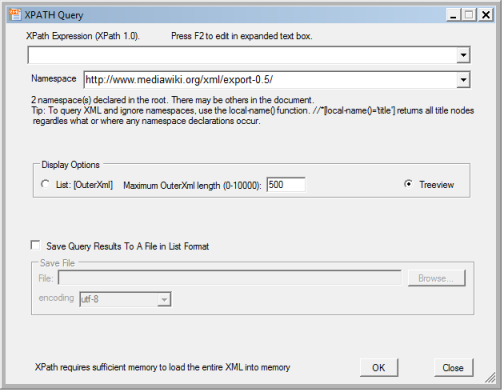
An Xpath expression may be entered into the dropdown list box, or in an optional textbox with wordwrap by pressing the F2 key.
While editing in the textbox, pressing the Enter key closes the textbox and copies its contents to the listbox, overwritting the item currently displayed.
The listbox holds up to ten Xpath expressions which are retained until the application is closed.
If the XML document contains one or more namespaces, the XPath dialaog includes a drop-down list containg the namespaces declared in the root element.
The XML may contain other namespaces.
If it has a default namespace it appears first in the list and all element names in the XPATH expression must have a prefix.
If there are other namespaces in the document, nodes in a specific namespace are located by entering that namespace.
IF the query result is a nodeset, it may be saved by checking Save Query Results to a File and completing the File parameters.
The file contains the same node data as in the List display option: the node name and its attributes.
There are two display options for viewing the query results if the result is a nodeset:
- List. This is a very basic list of the name of each returned node and its OuterXml property, whose display length may be set in the textbox provided.
- Tree view. Each nodeset item is added to the message grid at the bottom of the main window with a short snippet of its OuterXml, if it has one.
Double-clicking an item in the message grid displays that node in the Tree View
If the XPath query returns a value rather than a nodeset, the value is displayed in a message dialog.
Text Search and Replace
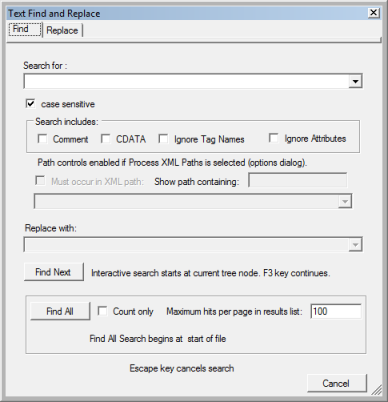
A text search may be initiated with the Text Search toolbar icon, the Edit menu or Ctrl +F. The dialog has two tabs, one for Find and one for Replace.
The default search includes tag names, attribute names and attribute values and is case sensitive. A checkbox option is provided to change the case sensitivity.
Other checkbox options allow for including tag names and attributes.
The option for "Must occur in XML path" is enabled only if the Process XML Paths option in the Options dialog was selected prior to opening the XML document.
The option lists all the paths in the XML file and any one may be selected to filter the search results.
Find All This function finds all hits in the document and lists them in a results list below the treeview. By default, this search finds the first 100 matches,
and that number may be changed in the Maximum hits textbox. After listing the specified number of hits, the header text of the list indicates id the search is incomplete, and if so, it may be resumed with the F3 key or scrolling or paging the hit list to the end, which triggers the search to resume. Double-clicking any item in the hit list displays it in the treeview. Paging up past the first displayed item re-populates the list with the previous set of hits.
When the last hit has been located, the header text in the list changes to indicate the total number. Ctrl + pgup goes to first item in the current subset
and Ctrl+pgdn to the last item.
Find All has the following two options:
Count only. The count only checkbox provides a relatively fast count especially if the XML path and XML content checkboxes are unchecked.
This option is disabled in the Replace tab.
Maximum hits per page. The number of hits listed may be specified here. If left empty it defaults to 100. Setting it to a lower value should reduce wait time,
especially in a large file. This option is disabled in the Replace tab.
Replace The Replace button executes an interactive find and replace. For each hit, a replace dialog asks for an OK to replace and gives options to skip to
the next hit, switch to the Replace All mode or to cancel the operation. Replace begins at the current treeview node, unless Replace All is selected which starts
at the beginning of the file. During interactive replace there is an option to switch to Replace All which continues the replace operation from the last
replaced XML node and continues to the end of the document without interruption. For both replace modes, all matches are listed in the results list.
Replace All The Replace All button executes a non-stop find and replace. It indicates the number of replacements when completed.
Navigation(paging or scrolling) during an interactive search resumes the search when the F3 key is pressed from the current treeview node.
Removing Illegal XML Characters
Characters allowed by XML have the hexadecimal code
numbers 09 (tab = U+0009), 0A (line feed = U+000A), 0D (carriage
return = U+000D), 20-D7FF (U+0020..U+D7FF), E000-FFFD
(U+E000..U+FFFD), and 10000-10FFFF (U+010000..U+10FFFF).
Characters outside of the above ranges are not allowed, even in a CDATA section. This function performs a byte scan of the selected file for characters
not in the above ranges,and removes them or optionally replaces them either with user-specified replacement text. The scan includes numeric character references
in decimal and hexidecimal notations, e.g.,  and , respectively.
Occurences of the ampersand and less than symbols, & and <, where they are not allowed(in XML content with the exception of a CDATA node) are not
processed by this scan. They are reported as errors when an XML file is opened in the treeview with an option to fix them.
Converting DateTime Strings
This feature searches the selected file for date-time strings and either converts them to their ISO 8601 equivalent, or optionally removes them based on
the status of the Remove Date and Remove Time checkboxes. The search includes the most common date and time formats, but not all. The ISO 8601 format
is yyyy-MM-ddTHH:mm:ss where the character "T" is a separator between the date and time and does not appear unless both the date and time occur.
There are four search options:
Date Only. Looks for a date. If a date is found with a time, the date is processed but the time field is ignored. If the Remove Time box is checked,
it is ignored.
Time Only. Looks for a time. If a time is found with a date the time is processed but the date field is ignored. If the Remove Date box is checked,
it is ignored.
Date or Time. Looks for a date or a time and converts either or both, or optionally removes either or both. This may be used, for example,
to remove a time field whether or not it occurs with a date field.
Date and Time. Looks for a date that occurs with a time and converts both, or optionally removes either or both.
This may be used, for example, to remove a time field only if it occurs with a date field.
Delete Range
This topic is covered in
Editing XML
Text Viewer
Opens text or XML files in a read-only file viewer. For full details see the topic
Text Viewer
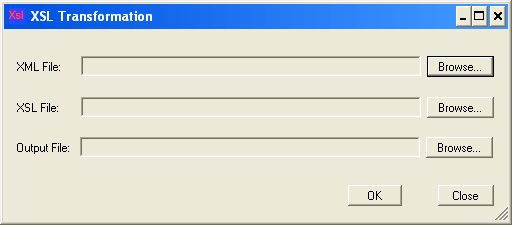
The XSLT item in the Tools menu displays a dialog for defining and executing an XSL transformation. XSLT is limited to documents that can be entirely
loaded into available memory. Unfortunately, there is no formula for calculating how much memory is needed to load a given XML file. In general,
the number of bytes of memory required ranges from three times the size of the file for relatively small files and upwards of five times the file size
for large XML files.
The dialog has three required input textboxes:
- The XML file to be transformed.
- The XSL stylesheet file.
- The file to write the result of the transformation.
There is no option to display the result of the transformation. If the output is an XML file, use the File\Open menu to open it to view it in the treeview.
Path Navigator
In order for this feature to be available, the XML file must be opened after the Process XML Paths checkbox is checked in the
Options Dialog.
The Path Navigator dialog lists every unique XML path in the document. Double-clicking a path displays the first occurence of that path.
In the treeview, Ctrl + P and Shift + P display the next and previous occurence of the path. The dialog may also be invoked with the Ctrl + V shortcut.
It automatically scrolls to the top of the list the path of the currently selected element in the treeview. The Show Path Containing box is a helper for
finding a path. It has auto-complete functionality where it selects the first path containing the typed text. It also responds to the down and up arrow
keys by showing the next and previous path, respectively.
